
In the first part we set up our environment and made a simple page which displays a label to make sure everything was working fine. In this part we’ll start to build the components of our chat.
Right now we have the following folder structure:
chat-app
 — app
     — boot.ts
     — chat-app.component.ts
 — bower_components
 — node_modules
 — package.json
 — tsconfig.json
 — bower.json
 — index.html
You will notice some .map and .js files inside the app folder as well. These files are generated from the TypeScript compiler, you don`t need to worry about it.
Let’s start!
The display component
The first component we’ll build is the one who will show the messages to the user. Inside the app folder, create a file called chat-display.component.ts and paste the following code:
import {Component} from 'angular2/core';
@Component({
    selector: 'chat-display',
    styles : [`
        .chat-display {
            height : 400px;
            overflow : auto;
        }
    `],
     template : `


     `
})
export class ChatDisplayComponent {
}
This code creates a component just like we saw in the Part 1. The selector property contains the name of the tag we have to use to show this component. The template property contains the value that will be appended on the component. In our case the value is a div, who have get one the thumbnail style from Bootstrap and the chat-display style from our component. To define styles, we use the styles property, which receives an array. In our case this array only contains our chat-display CSS class.
Important: Notice that the start and the end of the value are defined in grave accent (`) not in the normal single quote (‘). This is a feature called Template String.
Since we’re using Bootstrap we need to import it into our app. Go to the index.html file and paste the following line inside the head tag:
<link rel="stylesheet" href="bower_components/bootstrap/dist/css/bootstrap.min.css"></link>
We just finish our chat display for now. Simple like that! Now we have to show it on our page. To do it, we have to edit our chat-app component. Go to the chat-app.component.ts file, and add the following line right bellow the Component import call(this will be the second line of the file):
import {ChatDisplayComponent} from './chat-display.component';
This line will import our component to be used on this file. The next change we’ll need to do is replace the template property with this one (Notice we’re still using the grave accent (`)):
template : `

        Chat App — Made in Angular 2


    </div>
`,
Now our chat-app creates a container div, which shows a title (Chat App — Made in Angular 2) and our component on the screen. Right now our component is just an empty div, with a border. There is a final thing we need to do before we can run this code: inform our ChatAppComponent about the ChatDisplayComponent. We’ll do it by adding the directives property right bellow the template property, with this value:
directives : [ChatDisplayComponent]
After adding the directives property we can run our page to see the results. To do it, just run this command inside the chat-app folder:
npm start
This command is the same one we ran last time. It will compile the Typescript and run our server on http://localhost:3000. If you let this command running, it will auto-detect changes and update the page for you with the new content. Now we have our display component running, let’s make a component where the user will type his messages.
The input component
The input component is a text field that has the user’s name on the left, and a button to send the message on the right. Create a file called chat-input.component.ts and paste the following code:
import {Component} from 'angular2/core';
@Component({
    selector: 'chat-input',
     template : `

             {{username}}


                 Send message


     `,
    inputs : ['username']
})
export class ChatInputComponent {
    private username = 'Default username';
}
This component has three differences from the other ones:
- We defined a variable called username inside our class. We set it as a private variable and put the a default value of “Default username”.
- Inside the span tag we have a username wrapped in curly braces, which means we are using the value from the username variable defined in the ChatInputComponent class.
- We declare that the username variable is an input variable, using the inputs property on our component. If we don’t set the inputs property, Angular will throw us an error.
Important: unlike Angular 1, curly braces defines only one-way data binding. We’ll talk about two-way data binding in a moment.
Like the chat-display component, we need to add this on the chat-app component. Paste the following import line on the chat-app.component.ts file, right bellow the ChatDisplayComponent import:
import {ChatInputComponent} from './chat-input.component';
Now append this code on the div that uses the container CSS class:
Finally, add the ChatInputComponent directive to the directives property:
directives : [ChatDisplayComponent, ChatInputComponent]
Your chat-app.component.ts file should look like this:
import {Component} from 'angular2/core';
import {ChatDisplayComponent} from './chat-display.component';
import {ChatInputComponent} from './chat-input.component'
@Component({
    selector: 'chat-app',
    template : `

            Chat App — Made in Angular 2


        </div>
    `,
    directives : [ChatDisplayComponent, ChatInputComponent]
})
export class ChatAppComponent {
}
If we open our page now, we should see this layout:

Get the user’s name
Right now every user who accesses our app will be named “Default username”. That’s not cool, we need to get the username they want to define. Until they define a name, we’ll hide the components we’ve created so far. Let’s control it using a variable called hasUsername. In the chat-app.component.ts file make these changes:
export class ChatAppComponent {
    private hasUsername = false;
}
As the chat-app component will be the only one who controls whether we have a username or not, we’ll set this variable to private. We will also set the default value to false, since the username is not defined when the user first access the page. Now he have to hide our components until the user get his username. We’ll do it using the hidden property:
</div>
We define which property we want to define using square brackets around it. In our case, our components we’ll be hidden if the hasUsername variable is set to false. Now let’s work on enable the user to type his username. First, we need a variable to store the chosen username:
export class ChatAppComponent {
    private username : string;
With the username variable defined, we need to pass it to our chat-input component. We’ll do using the square brackets:
<chat-input [username]="username"></chat-input>
The next step is to define new elements to show to the user, so he can type the username he wants. Add the following code right bellow the code we just wrote inside the template property.
            Register


</div>
This code adds a text field and a register button. Notice the [(ngModel)]=”username” call, which has the brackets and parenthesis together. This is the ngModel directive and it represents the two-way data binding version of the Angular 2. Now every place that has the username variable will reflect the value from the input right away.
We’re almost finished on the visual part. We just need to allow the user to click on the button or press Enter to register his name.
Handling events
To call an event on Angular 2 is pretty simple: we just pass the event name wrapped in parenthesis and call the method we want to execute when it happens. The syntax is like this:
(eventType)= "myFunction($event)"
As I said before, we want to allow the user to register his username both by clicking in the button or pressing Enter when the input has focus. Let’s make the necessary changes on our code to call the proper events:
<input [(ngModel)]="username" class="form-control" (keypress)="verifyKey($event)" type="text" placeholder="Insert your username here…">
<span class="input-group-btn">
    <button class="btn btn-primary" type="button" (click)="register()">Register</button>
</span>
As you can see, the $event argument is optional. If we’re not going to use it we don’t need to pass it to our function.
Since we are calling two functions that still don’t exist, our next step is to create them. Add the following code inside the ChatAppComponent class:
register() {
    if(this.username) {
        this.hasUsername = true;
    } else {
        this.hasUsername = false;
    }
}
verifyKey(event) {
    if(event.keyCode == 13) {
        this.register();
    }
}
The register function checks for a value on the username variable. If it finds one it will change the hasUsername variable to true, otherwise it will assigned as false. Changing this variable to true will make or hidden property to change the behavior of the page: the register div will disappear and our chat div will be showing instead. The verifyKey function verifies the key that was pressed. If they keyCode is 13, it means that the user pressed Enter and we can call the register function.
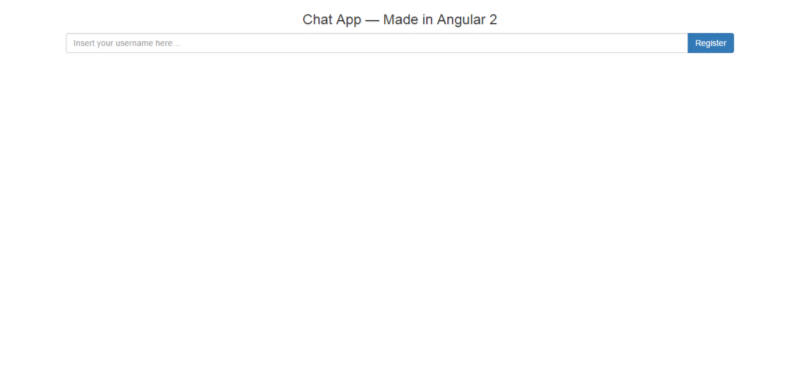
If we access the page now the layout should look like this:
We finished the second part of this tutorial! In the last part we will create our server in Express and make our chat app send and receive messages from it.
See you there.

Leave a comment